> ## Documentation Index
> Fetch the complete documentation index at: https://blockbear.app/llms.txt
> Use this file to discover all available pages before exploring further.
# journal
> card based journalling system
.png?fit=max&auto=format&n=SjTsj6GhTK-I8Mi0&q=85&s=03456f048711e66e326a259816a69029) | Num | Description |
| --- | ------------------- |
| 1 | Trackable Searchbar |
| 2 | Day Header |
| 3 | Day Options Button |
| 4 | Day Statistics |
| 5 | Card Swiper Deck |
| 6 | Previous Day Button |
| 7 | Next Day Button |
| 8 | Grid / Card Toggle |
### toggle grid view
to quickly view all the days in the block click the grid toggle
| Num | Description |
| --- | ------------------- |
| 1 | Trackable Searchbar |
| 2 | Day Header |
| 3 | Day Options Button |
| 4 | Day Statistics |
| 5 | Card Swiper Deck |
| 6 | Previous Day Button |
| 7 | Next Day Button |
| 8 | Grid / Card Toggle |
### toggle grid view
to quickly view all the days in the block click the grid toggle
.png?fit=max&auto=format&n=SjTsj6GhTK-I8Mi0&q=85&s=30094c7a35e0efec0708e7abe8a39825) clicking on the day card will open the nav the carousel to the day you
selected
## day flows
### add a card from catalogue
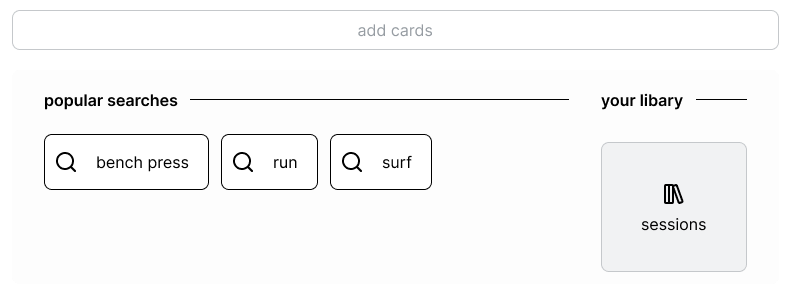
search for the card from the search bar. this will allow you to add any
measured, calculated, activity or activity session card from the catalogue
or your own.
If you select an activity card, the card will automatically be added to a blank session. Click into the session to view the activity card.
clicking on the day card will open the nav the carousel to the day you
selected
## day flows
### add a card from catalogue
search for the card from the search bar. this will allow you to add any
measured, calculated, activity or activity session card from the catalogue
or your own.
If you select an activity card, the card will automatically be added to a blank session. Click into the session to view the activity card.
 ### add a session card from library
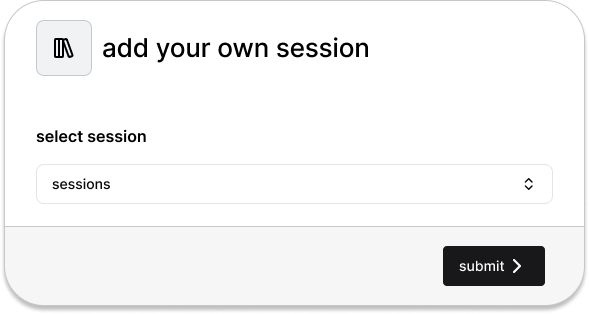
click on the searchbar and select the sessions button from “your library”
section.
search for your session in the add-user-session-to-day modal to enable you
to add the session to the current day
### add a session card from library
click on the searchbar and select the sessions button from “your library”
section.
search for your session in the add-user-session-to-day modal to enable you
to add the session to the current day
 ### delete a card
select the vertical ellipses and select "delete top card" from the
day-options
### navigate to a different day
either scroll through the day carousel or select grid view to view all of
the day cards in your block.
## activity session flows
### delete a card
select the vertical ellipses and select "delete top card" from the
day-options
### navigate to a different day
either scroll through the day carousel or select grid view to view all of
the day cards in your block.
## activity session flows
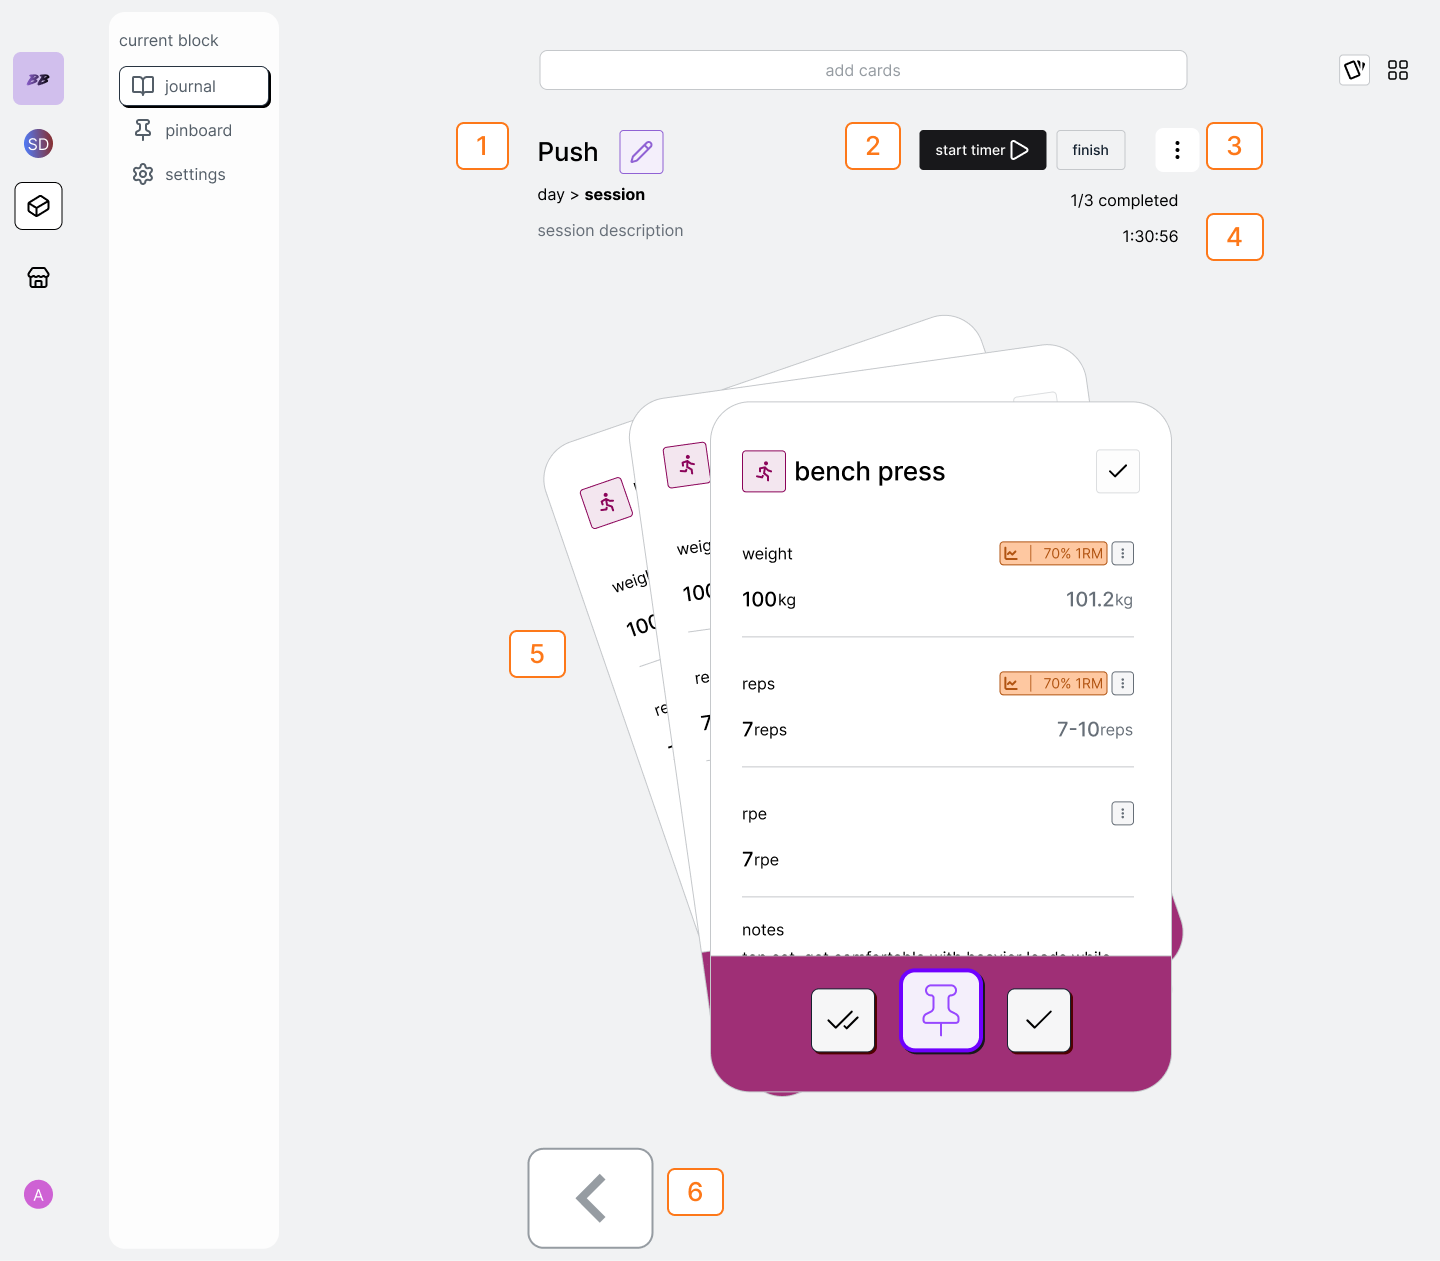 | Num | Description |
| --- | ----------------------------- |
| 1 | Session Header and Breadcrumb |
| 2 | Session Actions |
| 3 | Session Options |
| 4 | Session Options |
| 5 | Card Swiper Deck |
| 6 | Nav Back to Day |
### view an activity session
tap the view button of the activity session card to open the
activity-session-carousel. This will display all of the activity cards in
the session.
### add an activity card to a session
add an activity card from the same "add cards" search bar in the journal. If
you add an a-session-card or measure card whilst viewing the session, a
toast will remind you that only activity cards can be added to a session.
### delete an activity card from a session
add an activity card from the same "add cards" search bar in the journal. If
you add an a-session-card or measure card whilst viewing the session, a
toast will remind you that only activity cards can be added to a session.
### stop an activity session
Session Actions Coming Soon
from the activity-session-carousel, select the stop button from the
activity-session-session-options-group to stop the session timer. If the
session is a recorded session, the recorded will stop for the input fields.
### finish an activity session
select the finish button from the activity-session-options-group.
### finishing a manual session
when you finish a manual session, make sure to review the completion status
of the sessions cards before submitting the session. For example if you have
only completed 3/5 cards, then the session will only appear to show 60%
completion once submitted.
### finishing a manual session without starting
if you don't care about recording session time, feel free to complete the
cards directly using the card submit group
### finishing a recorded session
Recorded Sessions Coming Soon
when finishing a recorded session, there is no need to manually complete the
activity cards. The recorded fields will be submitted when you click the
finish the session.
### select either manual or record input types
Recorded Sessions Coming Soon
from the activity-session-carousel, select the vertical ellipses from the
options group and select either "manual" or "recorded" session. The session
badge type will change from to either a pencil or a watch, and the available
options in the action-group will be updated to reflect.
## activity card flows
## measured card flows
| Num | Description |
| --- | ----------------------------- |
| 1 | Session Header and Breadcrumb |
| 2 | Session Actions |
| 3 | Session Options |
| 4 | Session Options |
| 5 | Card Swiper Deck |
| 6 | Nav Back to Day |
### view an activity session
tap the view button of the activity session card to open the
activity-session-carousel. This will display all of the activity cards in
the session.
### add an activity card to a session
add an activity card from the same "add cards" search bar in the journal. If
you add an a-session-card or measure card whilst viewing the session, a
toast will remind you that only activity cards can be added to a session.
### delete an activity card from a session
add an activity card from the same "add cards" search bar in the journal. If
you add an a-session-card or measure card whilst viewing the session, a
toast will remind you that only activity cards can be added to a session.
### stop an activity session
Session Actions Coming Soon
from the activity-session-carousel, select the stop button from the
activity-session-session-options-group to stop the session timer. If the
session is a recorded session, the recorded will stop for the input fields.
### finish an activity session
select the finish button from the activity-session-options-group.
### finishing a manual session
when you finish a manual session, make sure to review the completion status
of the sessions cards before submitting the session. For example if you have
only completed 3/5 cards, then the session will only appear to show 60%
completion once submitted.
### finishing a manual session without starting
if you don't care about recording session time, feel free to complete the
cards directly using the card submit group
### finishing a recorded session
Recorded Sessions Coming Soon
when finishing a recorded session, there is no need to manually complete the
activity cards. The recorded fields will be submitted when you click the
finish the session.
### select either manual or record input types
Recorded Sessions Coming Soon
from the activity-session-carousel, select the vertical ellipses from the
options group and select either "manual" or "recorded" session. The session
badge type will change from to either a pencil or a watch, and the available
options in the action-group will be updated to reflect.
## activity card flows
## measured card flows
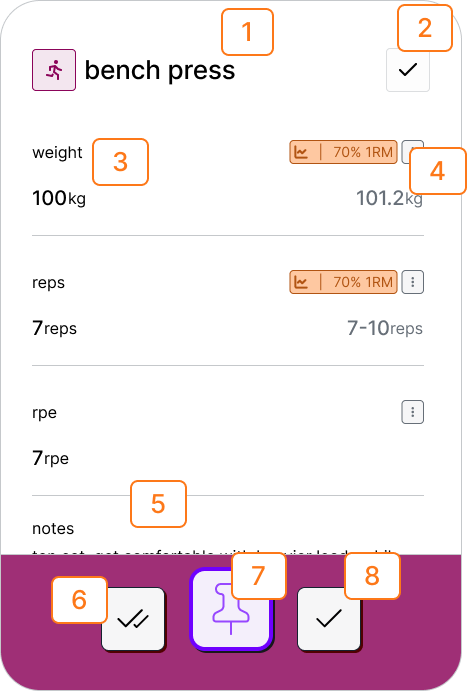 | Num | Description |
| --- | -------------------------------------------------- |
| 1 | Activity Trackable Header |
| 2 | Input Type and Completion Status (recorded/manual) |
| 3 | Field Name and Actual Value |
| 4 | Field Target and Options |
| 5 | Athlete Notes |
| 6 | Quick Complete Button |
| 7 | Go To Pin Button |
| 8 | Complete Button |
### view session targets
for both measured and activity cards, if a goal has been set from the
pinboard then the target field will display the target on the right hand
side of field. Targets are represented by either "goal", "calculated" or
"historic" badges.
### set goal targets
a goal target is the primary method of setting target fields for sessions. A
goal target is the value that a session should have to follow the target
trendline of the goal that is applied to the session pin. For example if you
have pinned bodyweight and set a 0.25% incremental percentage goal per.week,
then the target field will increment at 2.5% per week for the weight field
inside the bodyweight card.
To apply a goal-target, first pin the card, and select the goal icon when
viewing from your pinboard. You will be prompted to confirm that throughout
the rest of the block the target fields in the session-cards will be updated
to goal targets.
Once applied, the target badge is updated to a graph symbol.
### set calculated targets
a calculated target uses an equation to calculate what the target field of
an activity should be. For example 80% 1RM is an equation which multiples
your 1 rep map by 0.8. to quickly set a a calculated target on a field tap
the vertical ellipses on in the field options and select "set calculated
target". This will open the set-calculated-target-modal which will allow you
to select a calculation from the calculated-trackable-catalogue.
Once selected the field will have a calculator in the target badge with
truncated display text to indicate which calculation is applied to the
target fields.
### complete an activity
manually completing activity cards is only available when the session is set
to manual. This is because if set to auto, then cards will be automatically
completed once the session is finished
### using complete
tap the complete button at the bottom of the activity for the card to submit
with its current inputs
### using quick complete
Quick Complete Soon
tap the quick complete button at the bottom of the activity to use
quick-complete. this will automatically update any empty input fields to the
target when submitted; allowing you to quickly only add the fields in the
workout which were different to the target
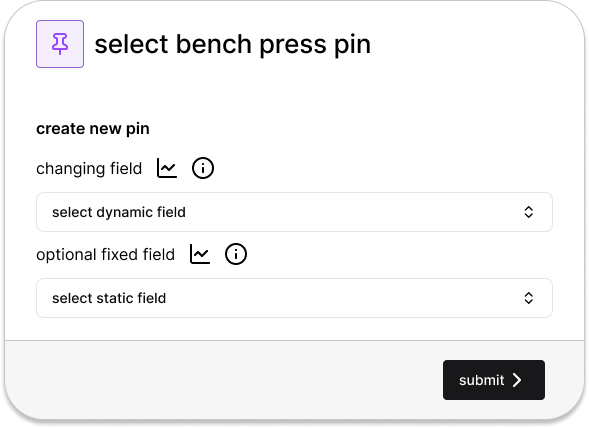
### pin an activity card
to create a pin select the pin in the footer of the card.activities can have
several fields, however each activity pin can only have one dynamic field,
and optionally a static field for increased specificity on your pin. When
pinning an activity, you will be prompted to either create a new pin with
different fields or continue to an existing pin (if it matches) through the
select-a-pin-modal
| Num | Description |
| --- | -------------------------------------------------- |
| 1 | Activity Trackable Header |
| 2 | Input Type and Completion Status (recorded/manual) |
| 3 | Field Name and Actual Value |
| 4 | Field Target and Options |
| 5 | Athlete Notes |
| 6 | Quick Complete Button |
| 7 | Go To Pin Button |
| 8 | Complete Button |
### view session targets
for both measured and activity cards, if a goal has been set from the
pinboard then the target field will display the target on the right hand
side of field. Targets are represented by either "goal", "calculated" or
"historic" badges.
### set goal targets
a goal target is the primary method of setting target fields for sessions. A
goal target is the value that a session should have to follow the target
trendline of the goal that is applied to the session pin. For example if you
have pinned bodyweight and set a 0.25% incremental percentage goal per.week,
then the target field will increment at 2.5% per week for the weight field
inside the bodyweight card.
To apply a goal-target, first pin the card, and select the goal icon when
viewing from your pinboard. You will be prompted to confirm that throughout
the rest of the block the target fields in the session-cards will be updated
to goal targets.
Once applied, the target badge is updated to a graph symbol.
### set calculated targets
a calculated target uses an equation to calculate what the target field of
an activity should be. For example 80% 1RM is an equation which multiples
your 1 rep map by 0.8. to quickly set a a calculated target on a field tap
the vertical ellipses on in the field options and select "set calculated
target". This will open the set-calculated-target-modal which will allow you
to select a calculation from the calculated-trackable-catalogue.
Once selected the field will have a calculator in the target badge with
truncated display text to indicate which calculation is applied to the
target fields.
### complete an activity
manually completing activity cards is only available when the session is set
to manual. This is because if set to auto, then cards will be automatically
completed once the session is finished
### using complete
tap the complete button at the bottom of the activity for the card to submit
with its current inputs
### using quick complete
Quick Complete Soon
tap the quick complete button at the bottom of the activity to use
quick-complete. this will automatically update any empty input fields to the
target when submitted; allowing you to quickly only add the fields in the
workout which were different to the target
### pin an activity card
to create a pin select the pin in the footer of the card.activities can have
several fields, however each activity pin can only have one dynamic field,
and optionally a static field for increased specificity on your pin. When
pinning an activity, you will be prompted to either create a new pin with
different fields or continue to an existing pin (if it matches) through the
select-a-pin-modal
 ## measured card flows
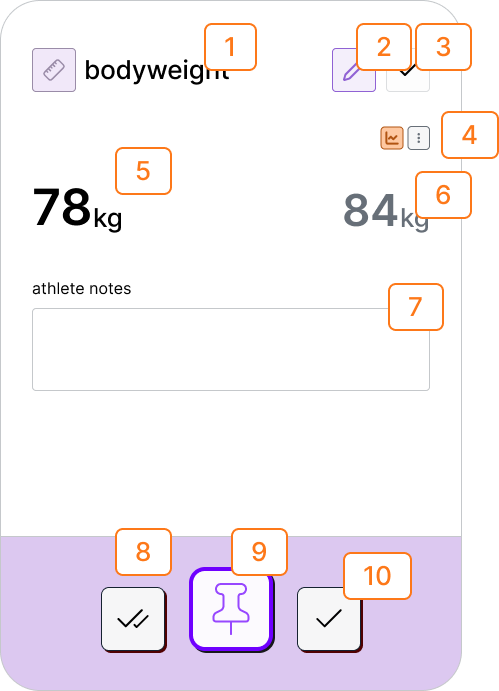 | Num | Description |
| --- | ---------------------------- |
| 1 | Measured Trackable Header |
| 2 | Input Type (recorded/manual) |
| 3 | Completion Status |
| 4 | Field Option Dropdown |
| 5 | Actual Value |
| 6 | Target Value |
| 7 | Athlete Notes |
| 8 | Quick Complete Button |
| 9 | Go to Pin Button |
| 10 | Complete Button |
### select either manual or record input types
tap on the input badge to select the input-type to change input type or
record with the input-select-modal. Alternatively tap the vertical ellipses
to select recorded value.
### view targets
tap on the pin to navigate to the pinboard to a goal. When the goal is
created, all journal entries which match the pin will be updated and the
target badge will show the graph.
### set goal target
tap the field options and select "align to pin goal". This will return the
value of the target value for the m-card given the target trendline. if the
pin does not have a corresponding goal, the option will read "create pin
goal", where you will be navigated to the pin so you can create a goal.
After the goal target is set, the field will have the goal target badge.
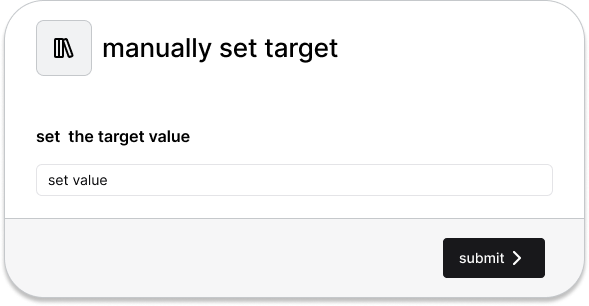
### set manual target
tap the field options and select "set manual goal". This will open the
set-goal-value-modal allowing you to manually input the target value.
After the goal target is set, the field will have the pencil target badge.
| Num | Description |
| --- | ---------------------------- |
| 1 | Measured Trackable Header |
| 2 | Input Type (recorded/manual) |
| 3 | Completion Status |
| 4 | Field Option Dropdown |
| 5 | Actual Value |
| 6 | Target Value |
| 7 | Athlete Notes |
| 8 | Quick Complete Button |
| 9 | Go to Pin Button |
| 10 | Complete Button |
### select either manual or record input types
tap on the input badge to select the input-type to change input type or
record with the input-select-modal. Alternatively tap the vertical ellipses
to select recorded value.
### view targets
tap on the pin to navigate to the pinboard to a goal. When the goal is
created, all journal entries which match the pin will be updated and the
target badge will show the graph.
### set goal target
tap the field options and select "align to pin goal". This will return the
value of the target value for the m-card given the target trendline. if the
pin does not have a corresponding goal, the option will read "create pin
goal", where you will be navigated to the pin so you can create a goal.
After the goal target is set, the field will have the goal target badge.
### set manual target
tap the field options and select "set manual goal". This will open the
set-goal-value-modal allowing you to manually input the target value.
After the goal target is set, the field will have the pencil target badge.
 ### pin a measured card
to create a pin select the pin in the footer of the card
### complete a measure card
manually completing activity cards is only available when the session is set
to manual. This is because if set to auto, then cards will be automatically
completed once the session is finished.
### using complete
tap the complete button at the bottom of the activity for the card to submit
with its current inputs
### using quick complete
Quick Complete Soon
tap the quick complete button at the bottom of the activity to use
quick-complete. this will automatically update any empty input fields to the
target when submitted; allowing you to complete the card without typing in
any inputs if you hit your target.
## calculation flows
### pin a measured card
to create a pin select the pin in the footer of the card
### complete a measure card
manually completing activity cards is only available when the session is set
to manual. This is because if set to auto, then cards will be automatically
completed once the session is finished.
### using complete
tap the complete button at the bottom of the activity for the card to submit
with its current inputs
### using quick complete
Quick Complete Soon
tap the quick complete button at the bottom of the activity to use
quick-complete. this will automatically update any empty input fields to the
target when submitted; allowing you to complete the card without typing in
any inputs if you hit your target.
## calculation flows
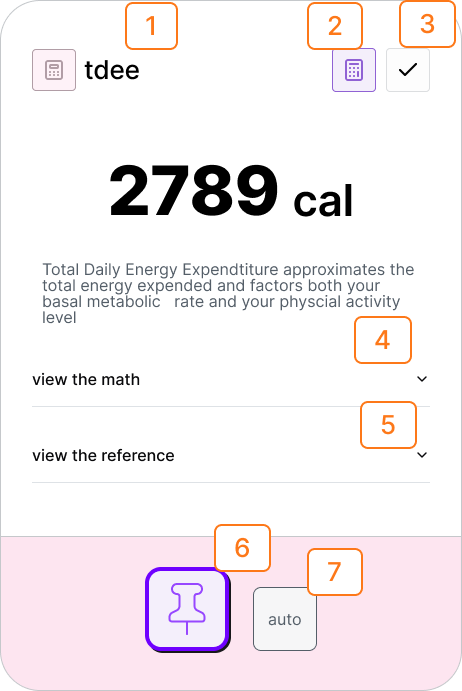 | Num | Description |
| --- | ---------------------------- |
| 1 | Calculation Trackable Header |
| 2 | Input Type (calculated) |
| 3 | Value |
| 4 | View Math Accordian |
| 5 | View Reference Accordian |
| 6 | Go To Pin Button |
| 7 | Disabled Complete Button |
### view the math
tap on ‘view the math’ button to view how we calculated the value and the formula we used.
### view the reference
for equations which have a reference; we’ll provide the link so you can do your own reseach.
| Num | Description |
| --- | ---------------------------- |
| 1 | Calculation Trackable Header |
| 2 | Input Type (calculated) |
| 3 | Value |
| 4 | View Math Accordian |
| 5 | View Reference Accordian |
| 6 | Go To Pin Button |
| 7 | Disabled Complete Button |
### view the math
tap on ‘view the math’ button to view how we calculated the value and the formula we used.
### view the reference
for equations which have a reference; we’ll provide the link so you can do your own reseach.